
So you now have your dog grooming clippers and the appropriate dog grooming blades for the length of coat you prefer your dog to have. Once you have put the applicable blade onto the clippers (for instructions on attaching the blade to the clipper refer to our page on Dog Clipper Blades) and plugged the clippers into the powerpoint (unless you are using battery operated clippers) you are ready to start clipping your dog. Remember – do not attach or detach any blade while the clipper is running!
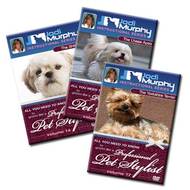
The Puppy Cut DVD by Jodi Murphy
from: CherryBrook
This 60 minute DVD is Master Certified Pet Stylist Jodi Murphy’s interpretation of the puppy cut. Learn how to capture that adorable look of the 5 month old puppy. Do not be misled; this trim is not just for puppies. Variations of lengths can be used on any coated breed of any age. Not only will Jodi show you safe scissoring techniques to use on a puppy she will also discuss puppy coat, proper handling and grooming of these babies. Proper puppy training and handling on the grooming table will determine the behavior of the adult dog.
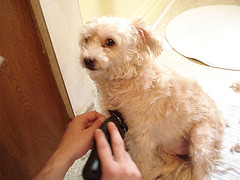
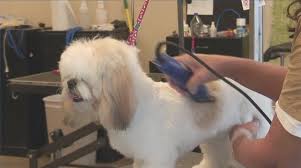 Once the blade is in position, switch the clippers on and hold them comfortably in your hand. Hold the clippers so that the flat side of the blade runs along the surface of the dog’s body. You can start your clip anywhere on the dog’s body, however it is easier to follow the same clipping pattern and routine each time. This may help the dog to get used to being clipped plus help him feel a little more relaxed each time you do the job. The clippers should glide through the coat without too much pressure unless, of course, the dog is matted or very thick coated, in which case you may need to gently exert a little pressure to get the blade through the thickness. Always keep the clipper blade flat against the body of the dog, otherwise you may end up cutting into the skin. Blades are very sharp and can easily cut if they are not kept level (if blades are not sharp then they will not cut through the fur with ease – refer to our page on Dog Clipper Blades for information about sharpening). The danger spots for cutting into the skin is on the legs and the very thin folds of skin as you stretch the leg out however, unless you are careful, it is possible to cut the dog anywhere on the body.
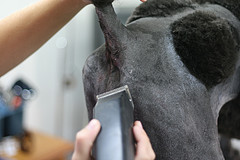
The clippers should be run according to the direction of the coat on the dog. If you run the clippers in the opposite direction to the way the coat flows then you will end up with a shorter length again.
………………………………………………….. ……………………………………………………………..
Using the Dog Clippers
Now you are ready to use the clippers on your dog. Remember that you are basically giving your dog a shave, so until you are used to it take your time and stop to have a rest if you need to. It is best for you and your dog if you work to a pattern – i.e. you start and work your way around the dog the same way each time you give him a clip. This will help you both get used to it and become more comfortable each time. You can do this by following the steps below:
- Start by clipping from the top of the head down the neck and shoulder area and then under the ear, chin and throat area and down the chest.
- Continue clipping down the front leg – gently; but firmly pick up the dog’s leg and hold it straight out in front. This is where your dog might get wriggly and more difficult. Don’t bend the leg into an unnatural position as you can easily do the dog some damage. Be careful of the very thin parts of skin – if the clippers are pressed too hard on these parts it is possible the skin will be cut. You will need to raise the leg to the side a little to get the clippers right into the shoulder area. This is the area which tends to mat up first so if you find it too difficult with the clippers then you might prefer to cut the fur here with the scissors. Run the clippers right down the legs and over the paw making sure you manoevre all around the leg. Be careful of the dew claw (side nail) you don’t want the blade to cut into that.
- Continue to run the clippers over the dog’s back and then down the side of the body. You will need to lift the front leg up in order to manoevre the clippers from the chest area to underneath the belly.
- Next is the hind leg area. It will be reasonably easy to clip the outside of the hind leg however then you will need to move the leg in order to get to the inside. You can turn the dog around and then lift the other hind leg so as you can get the clippers in to the inside of the hind leg you are working on. Once again, be gentle as you hold the leg and don’t manoevre the dog into an awkward position.
- Once the hind leg is done clip run the clippers from the body and about an inch down the tail all around. You might prefer to work on the other hind leg in the same way before you change blades to clip around the anal area and underneath the tummy area.
- Now is a good time to change the blade to the number 10 for a very short cut around the anal area and the tummy. In the same manner of holding the clippers hold the tail up and use the clippers around the anal opening and the down the backside. Then lift the hind leg up and out enough that you can then clip around the tummy area. Take care to only use this blade at the back end area there where matting tends to occur more easily, generally no further forward than the hind leg.
- You will then need to change blades back to the longer length to continue clipping the other side of the dog.
You may prefer to keep going from the back and finishing up at the head area of the other side so the dog is completed in a continuous fashion and no parts get missed. This routine may not work if you have a very fidgety dog and it may be necessary to do a part of the clipping and then giving it a break before continuing.
Check out these Dog Grooming DVD’s from Cherrybrook.com!
Some dogs may not tolerate grooming at all and this can be very difficult as it may need two people to work with the dog or at the very worst the dog may need to be taken to a vet for sedating. This then becomes a very expensive exercise. With the right preparation from puppyhood and training your dog should learn to accept grooming as a part of life, however sometimes it is difficult if you have acquired a rescue dog which has not been trained for the grooming procedure. It may take a lot of effort on your part to change the dog’s behaviour to accept being groomed in this instance.
This clipping procedure is not the only part of the job. Trimming the dog’s face, feet or tail is covered on a separate page as is clipping the dog’s nails and cleaning your dog’s ears are also things that may need to be done.
RELATED PAGES:
An Introduction To Clipping Your Dog
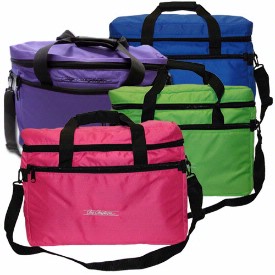
The Chris Christensen Kool Bag from Cherrybrook
The Chris Christensen Kool Bag is the perfect accessory to hold all your pet gear or your Chris Christensen dryer. This durable gear bag is strong with lots of pockets for storage. The Chris Christensen Kool Bag will hold the Kool Dry Dryer and Kool Pup Dryer.
Measures approximately 17.25″ long, 6.5″ wide and 11.5″ tall
Available in 7 colors!
.